Monday, June 29, 2009

Fee Fi Faux Pho

(Borrowed from Pleasures of the Vietnamese Table by Mai Pham)

Serves 6 as a main dish...
BROTH:
  • 6 whole star anise, lightly toasted in a dry pan for 2 minutes
  • 6 whole cloves, lightly toasted in a dry pan for 2 minutes
  • 1 teaspoon whole black peppercorns
  • 2 quarts store-bought low-sodium chicken broth
  • 2 cups water
  • 1 (3-inch) piece ginger, cut in half lengthwise, lightly bruised with the flat side of a knife and charred.
    • Char ginger by holding the piece with tongs direcly over an open flame or placing it on a medium-hot electric burner. Turn and char edges until they are slightly blackened and the ginger is fragrant (3-4 minutes).
  • 1 small yellow onion, charred.
  • 3 tablespoons fish sauce
  • 1 tablespoon sugar
  • 1/4 teaspoon salt
  • 2 chicken thighs or breasts (1 1/4 lbs)
In a large pot, bring star anise, cloves, black peppercorns, chicken broth, water, ginger, onion, fish sauce, sugar, and salt to a boil.
Add the chicken and cook for 5 minutes.
Reduce the heat and simmer until the chicken is done for 15 minutes.
Remove the chicken and set aside to cool. Keep broth simmering.
Hand-shred the chicken into thick strips.

NOODLE ASSEMBLY:
  • 1 lb dried 1/16-inch-wide rice sticks, cooked
  • 1/3 yellow onion, sliced paper-thin
GARNISHES:
  • 2 scallions, cut into thin rings
  • 3 tablespoons finely chopped cilantro
  • 1/2 lb bean sprouts
  • 10 springs Asian basil
  • Thin rings of serrano chili or Thai bird chilies
  • Fresh lime wedges
To serve, place cooked noodles in the bottom of the bowls.
Layer noodles with a few slices of yellow onions and shredded chicken.
Ladle boiling broth on top.
Garnish with scallions and cilantro, and/or bean sprouts, Asian basil, chili, or squeezes from lime wedges.

ENJOY!

Sunday, June 28, 2009

First Challenge from "Fresh from the Oven"... Rustic Bread


As if I didn't have enough to do to keep up with Daring Kitchen challenges, I decided I simply HAD to join this lovely group of bread bakers, Fresh From the Oven. If not, I might never get beyond mundane pan loaves. Already I've be very grateful for the nudges and the advice. Thanks, guys!

Whether you are a baker or not, please check out the recipe at this lovely blog, The Fresh Loaf. I have to say it went more smoothly than I expected, but, also, the results were not exactly what I expected:

- The preferment (a dough base that uses a minimal amount of yeast to create a nice, slow, initial rise) came together for me like a charm. After mixing, I still had a bit of dry flour hanging out in the bottom of the bowl, so I gave the whole thing a couple quick kneads and it came together perfectly (lumpish but hydrated).
- In about 14 hours preferment was bubbly looking but pulled like taffy in chunks out of the bowl as I added it to the rest of the dough ingredients. I would put in 3 or 4 chunks, then give a couple quick kneads, then add a few more chunks. The two components incorporated beautifully, and working it by hand wasn't really any problem.
- Our humid Massachusetts weather must be perfect, because it rose right on schedule. I improvised the shaping into battards based on a few different instructions (especially Nick Malgieri in How to Bake). I decided to let the shaped loaves raise on a cookie sheet with cornmeal to prevent sticking. I tossed a cup of water into the bottom of the over as I slid the loaves in. Internal temperature (according to my instant read thermometer) reached 200 degrees just a minute or two shy of the 35 minute rough approximation from the recipe.

The results:
- Pretty tops, but the loaves merged into each other and kissed sides. No big deal, just not a perfect a final loaf. Next time I think I'll go for simple rounds. (Update: Corry had some great advice/ Why not just bake the loaves one at a time. An extra half hour of final rising isn't going to hurt anything.)
- Bottom of bread looks underdone! That cookie sheet really sucked some temperature off. Next time I've got to figure out a way to go directly on to my stone or preheat the sheet or something. It tastes fine, but it looks odd.
- I also think my instant read thermometer is a bit off. (I've noticed that roasts are a little less done than they should be, etc.) I'll have to add an extra 5 or 10 degrees for the target time, I think.
- The taste is nice and clean. (Didn't have a sour undertone from the preferment, at least not that I could taste.) The texture and grain have a nicer chew than the pan breads I usually make, but I was rather expecting a bigger difference there. I also thought the whole structure could have been a bit taller and stronger.
The rye four I used was stone ground. I wonder if that affected the texture some. Did it need something a little more fine grain to get a better chew/texture?
(Update: The bread improved with age! The next few days after first baking, the bread was at its best.)

Goals for future rustic loaves:
- Experiment with flours
- Improving shaping technique
- Find optimal baking surface

Bakewell Tart...er...Pudding


Well, here is the latest Daring Baker challenge. (Sorry it's a day late; my camera was having problems uploading). First, the "fine print":

The June Daring Bakers' challenge was hosted by Jasmine of Confessions of a Cardamom Addict and Annemarie of Ambrosia and Nectar. They chose a Traditional (UK) Bakewell Tart... er... pudding that was inspired by a rich baking history dating back to the 1800's in England.

Thanks, Jasmine and Annemarie!

A Bakewell Tart...er...Pudding is one of those interesting traditional English recipes that has lots of competing names, techniques and ingredients. I can't post all the details here, but let me know if you want more info (like, say, the recipe), and I'll gladly send it your way! Basically, though, it's a shortcrust pastry with a layer of fruit curd or jam and topped with fangipane (a kind of almond-egg-butter kinda soft, kinda chewy topping).

Since this challenge was in part about using seasonal fruit, I wanted to make a jam with fresh rhubarb from a friend's garden, but it wasn't ready for harvest. Next best option: LINGONBERRIES!

Perhaps I made this tart too quickly. Perhaps the kitchen was a little too hot for the butter stages. In any case, even though each stage seemed to go well (I brushed the crust with egg and poked holes for blind baking, the pre-baked crust looked nice, the frangipane looked right, I piped the frangipane in rather than spreading to prevent leaks), the end result was a flat frangipane toppping, too dark on top and not fully cooked/fluffy beneath. Bleh. I'm guessing that for some reason the specified 400 degree oven was, for my assembled components, too hot.
Everyone at the bbq where it was served seemed to like it, fortunately, and not a crumb was left. That's good, though I'll definitely tinker with the baking stage if I make this again. Cheers, all!

Saturday, June 20, 2009

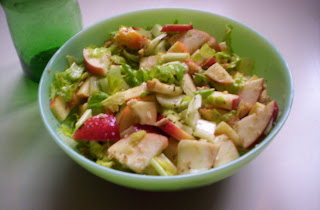
So you've got nothing for a salad: Apples and Celery Salad (in a pinch)


I guess I've been on this anti-lettuce kick for a while. Okay, not an anti-lettuce kick as such, but a resistance to the idea that every salad has to begin with lettuce and tomato (especially if tomatoes are out of season and the lettuce is all wilted at the store). Often the salad urge comes without the kinds of ingredients you automatically associate with salad. Well, I think you can make a delightful salad with probably anything you have around the house.

Case in point: Desperate for something cool, succulent, and refreshing today, I realized that I had almost nothing around but celery and some SwiftlyWiltingApples. No promblem! One of my favorites. Since living in Japan, where one obasan used to make sandwiches with a fabulous mix of veggies AND apple, I have come to regard the fruit as a perfect alternative for "sweet vegetables" (like tomato, red pepper, carrot, and even onion). Also, I've recently become a serious celery afficionado (or is that "afficionada"?). I'm particularly partial to the inner stalks of palest green and their attached leaves that run in color from green to yellow. I used to reserve celery leaves for making stock, but then I realized how much interesting flavor they could add to a chopped salad. Just the other week I also discovered that the celery leaves are high in potassium. I've also stopped neglecting the tougher "heart" of the celery near the base. Like the hearts of lettuce, it can be strong, sharp, rooty, and even nicely bitter. I usually cut the heart/core lengthwise (in half or in quarters, depending on the size) and slice in thin slivers to distribute through the salad. (An equally good technique for celery and for lettuce hearts.) Sliced thin, they do not overpower any single bite but lend their sharp and earthy goodness to the whole salad.

Oh, and did I mention this salad is Super Cheap?

Recipe:

- 1 inner stalk and core of celery, with leaves (stalks sliced into small bite-sized pieces along with attached leaves, core sliced thin)
- 2 apples (don't bother peeling, just chop into small bite sized pieces.

- 2 Tbs. rice vinegar (or whatever you have handy; I just like rice vinegar)
- 2 Tbs. olive oil
- 1-2 tsp. mustard
- 1-2 tsp. honey
- 1 tsp. tarragon (rubbed between palms to crush) (if you don't have tarragon, any "high taste" herb like marjoram, basil, or basil would be nice, too, I'm sure)
- big pinch o' salt

- handful finely chopped walnuts (optional, but I really like them)

Toss celery and apple in bowl. Whisk together dressing ingredients, taste and adjust as necessary. (The trick to tasting a vinegarette is to get all parts of your palate--sweet, sour, salty, and savory--firing more or less equally.) Toss the dressing over celery and apples (making especially sure to coat the apples so the vinegar can prevent them browning). Toss walnuts in last.

A good lunch when you want something light. Also nice on the side of something savory like a roast. This is a good fall-back salad for all four seasons.