Monday, June 29, 2009

Fee Fi Faux Pho

(Borrowed from Pleasures of the Vietnamese Table by Mai Pham)

Serves 6 as a main dish...
BROTH:
  • 6 whole star anise, lightly toasted in a dry pan for 2 minutes
  • 6 whole cloves, lightly toasted in a dry pan for 2 minutes
  • 1 teaspoon whole black peppercorns
  • 2 quarts store-bought low-sodium chicken broth
  • 2 cups water
  • 1 (3-inch) piece ginger, cut in half lengthwise, lightly bruised with the flat side of a knife and charred.
    • Char ginger by holding the piece with tongs direcly over an open flame or placing it on a medium-hot electric burner. Turn and char edges until they are slightly blackened and the ginger is fragrant (3-4 minutes).
  • 1 small yellow onion, charred.
  • 3 tablespoons fish sauce
  • 1 tablespoon sugar
  • 1/4 teaspoon salt
  • 2 chicken thighs or breasts (1 1/4 lbs)
In a large pot, bring star anise, cloves, black peppercorns, chicken broth, water, ginger, onion, fish sauce, sugar, and salt to a boil.
Add the chicken and cook for 5 minutes.
Reduce the heat and simmer until the chicken is done for 15 minutes.
Remove the chicken and set aside to cool. Keep broth simmering.
Hand-shred the chicken into thick strips.

NOODLE ASSEMBLY:
  • 1 lb dried 1/16-inch-wide rice sticks, cooked
  • 1/3 yellow onion, sliced paper-thin
GARNISHES:
  • 2 scallions, cut into thin rings
  • 3 tablespoons finely chopped cilantro
  • 1/2 lb bean sprouts
  • 10 springs Asian basil
  • Thin rings of serrano chili or Thai bird chilies
  • Fresh lime wedges
To serve, place cooked noodles in the bottom of the bowls.
Layer noodles with a few slices of yellow onions and shredded chicken.
Ladle boiling broth on top.
Garnish with scallions and cilantro, and/or bean sprouts, Asian basil, chili, or squeezes from lime wedges.

ENJOY!

Sunday, June 28, 2009

First Challenge from "Fresh from the Oven"... Rustic Bread


As if I didn't have enough to do to keep up with Daring Kitchen challenges, I decided I simply HAD to join this lovely group of bread bakers, Fresh From the Oven. If not, I might never get beyond mundane pan loaves. Already I've be very grateful for the nudges and the advice. Thanks, guys!

Whether you are a baker or not, please check out the recipe at this lovely blog, The Fresh Loaf. I have to say it went more smoothly than I expected, but, also, the results were not exactly what I expected:

- The preferment (a dough base that uses a minimal amount of yeast to create a nice, slow, initial rise) came together for me like a charm. After mixing, I still had a bit of dry flour hanging out in the bottom of the bowl, so I gave the whole thing a couple quick kneads and it came together perfectly (lumpish but hydrated).
- In about 14 hours preferment was bubbly looking but pulled like taffy in chunks out of the bowl as I added it to the rest of the dough ingredients. I would put in 3 or 4 chunks, then give a couple quick kneads, then add a few more chunks. The two components incorporated beautifully, and working it by hand wasn't really any problem.
- Our humid Massachusetts weather must be perfect, because it rose right on schedule. I improvised the shaping into battards based on a few different instructions (especially Nick Malgieri in How to Bake). I decided to let the shaped loaves raise on a cookie sheet with cornmeal to prevent sticking. I tossed a cup of water into the bottom of the over as I slid the loaves in. Internal temperature (according to my instant read thermometer) reached 200 degrees just a minute or two shy of the 35 minute rough approximation from the recipe.

The results:
- Pretty tops, but the loaves merged into each other and kissed sides. No big deal, just not a perfect a final loaf. Next time I think I'll go for simple rounds. (Update: Corry had some great advice/ Why not just bake the loaves one at a time. An extra half hour of final rising isn't going to hurt anything.)
- Bottom of bread looks underdone! That cookie sheet really sucked some temperature off. Next time I've got to figure out a way to go directly on to my stone or preheat the sheet or something. It tastes fine, but it looks odd.
- I also think my instant read thermometer is a bit off. (I've noticed that roasts are a little less done than they should be, etc.) I'll have to add an extra 5 or 10 degrees for the target time, I think.
- The taste is nice and clean. (Didn't have a sour undertone from the preferment, at least not that I could taste.) The texture and grain have a nicer chew than the pan breads I usually make, but I was rather expecting a bigger difference there. I also thought the whole structure could have been a bit taller and stronger.
The rye four I used was stone ground. I wonder if that affected the texture some. Did it need something a little more fine grain to get a better chew/texture?
(Update: The bread improved with age! The next few days after first baking, the bread was at its best.)

Goals for future rustic loaves:
- Experiment with flours
- Improving shaping technique
- Find optimal baking surface

Bakewell Tart...er...Pudding


Well, here is the latest Daring Baker challenge. (Sorry it's a day late; my camera was having problems uploading). First, the "fine print":

The June Daring Bakers' challenge was hosted by Jasmine of Confessions of a Cardamom Addict and Annemarie of Ambrosia and Nectar. They chose a Traditional (UK) Bakewell Tart... er... pudding that was inspired by a rich baking history dating back to the 1800's in England.

Thanks, Jasmine and Annemarie!

A Bakewell Tart...er...Pudding is one of those interesting traditional English recipes that has lots of competing names, techniques and ingredients. I can't post all the details here, but let me know if you want more info (like, say, the recipe), and I'll gladly send it your way! Basically, though, it's a shortcrust pastry with a layer of fruit curd or jam and topped with fangipane (a kind of almond-egg-butter kinda soft, kinda chewy topping).

Since this challenge was in part about using seasonal fruit, I wanted to make a jam with fresh rhubarb from a friend's garden, but it wasn't ready for harvest. Next best option: LINGONBERRIES!

Perhaps I made this tart too quickly. Perhaps the kitchen was a little too hot for the butter stages. In any case, even though each stage seemed to go well (I brushed the crust with egg and poked holes for blind baking, the pre-baked crust looked nice, the frangipane looked right, I piped the frangipane in rather than spreading to prevent leaks), the end result was a flat frangipane toppping, too dark on top and not fully cooked/fluffy beneath. Bleh. I'm guessing that for some reason the specified 400 degree oven was, for my assembled components, too hot.
Everyone at the bbq where it was served seemed to like it, fortunately, and not a crumb was left. That's good, though I'll definitely tinker with the baking stage if I make this again. Cheers, all!

Saturday, June 20, 2009

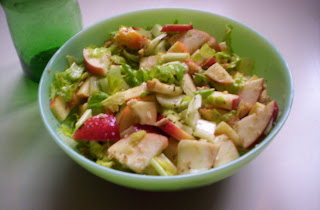
So you've got nothing for a salad: Apples and Celery Salad (in a pinch)


I guess I've been on this anti-lettuce kick for a while. Okay, not an anti-lettuce kick as such, but a resistance to the idea that every salad has to begin with lettuce and tomato (especially if tomatoes are out of season and the lettuce is all wilted at the store). Often the salad urge comes without the kinds of ingredients you automatically associate with salad. Well, I think you can make a delightful salad with probably anything you have around the house.

Case in point: Desperate for something cool, succulent, and refreshing today, I realized that I had almost nothing around but celery and some SwiftlyWiltingApples. No promblem! One of my favorites. Since living in Japan, where one obasan used to make sandwiches with a fabulous mix of veggies AND apple, I have come to regard the fruit as a perfect alternative for "sweet vegetables" (like tomato, red pepper, carrot, and even onion). Also, I've recently become a serious celery afficionado (or is that "afficionada"?). I'm particularly partial to the inner stalks of palest green and their attached leaves that run in color from green to yellow. I used to reserve celery leaves for making stock, but then I realized how much interesting flavor they could add to a chopped salad. Just the other week I also discovered that the celery leaves are high in potassium. I've also stopped neglecting the tougher "heart" of the celery near the base. Like the hearts of lettuce, it can be strong, sharp, rooty, and even nicely bitter. I usually cut the heart/core lengthwise (in half or in quarters, depending on the size) and slice in thin slivers to distribute through the salad. (An equally good technique for celery and for lettuce hearts.) Sliced thin, they do not overpower any single bite but lend their sharp and earthy goodness to the whole salad.

Oh, and did I mention this salad is Super Cheap?

Recipe:

- 1 inner stalk and core of celery, with leaves (stalks sliced into small bite-sized pieces along with attached leaves, core sliced thin)
- 2 apples (don't bother peeling, just chop into small bite sized pieces.

- 2 Tbs. rice vinegar (or whatever you have handy; I just like rice vinegar)
- 2 Tbs. olive oil
- 1-2 tsp. mustard
- 1-2 tsp. honey
- 1 tsp. tarragon (rubbed between palms to crush) (if you don't have tarragon, any "high taste" herb like marjoram, basil, or basil would be nice, too, I'm sure)
- big pinch o' salt

- handful finely chopped walnuts (optional, but I really like them)

Toss celery and apple in bowl. Whisk together dressing ingredients, taste and adjust as necessary. (The trick to tasting a vinegarette is to get all parts of your palate--sweet, sour, salty, and savory--firing more or less equally.) Toss the dressing over celery and apples (making especially sure to coat the apples so the vinegar can prevent them browning). Toss walnuts in last.

A good lunch when you want something light. Also nice on the side of something savory like a roast. This is a good fall-back salad for all four seasons.

Friday, May 29, 2009

Back to Basics: BEETS AND GREENS SALAD


Sorry about all the showy stuff. I like doing the baking challenges and wedding cakes and all, but it’s springtime, and in springtime a girl’s heart turns to whatever is coming out of the garden first. It’s probably a bit too early for most of us to find fine young beets with their fresh leafy greens still attached, but when you do see ‘em, GRAB ‘EM! The balance of the sweet beet roots and the earthy greens in the salad is just fabulous. A good iron boost, too.

1 bunch beets with greens still attached
X cloves of garlic (I leave how many cloves to your own palate and conscience; maybe start with 3 cloves and see how it looks)
olive oil
salt and pepper
crumbled blue OR feta cheese (optional, I guess, but I really like how it pulls the flavors together)

Prepare the beets:
Trim the beet greens off about an inch from root. Set aside.
Give the beet roots a little rinse and quick scrub. Trim off either end. Depending on size of beet and degree of cook’s impatience, half or quarter beets to decrease cooking time.
Cook beets until tender by your preferred method (wrapped in wax paper in the microwave usually does fine, as does boiling, but if I have the patience and attention not to let the water boil away and carbonize the bottom of my saucepot like last time I made this, I think steaming is the best method – most even cooking and least water logging).
Let the beets cool until you can handle them. Then you can just push the skin off with your thumb. (Don’t worry – your pink fingers will be back to a normal color very soon.) Cut beets into bite-sized chunks.)

As you are waiting for the beets to be done, you can

Prepare the greens:

Rinse the greens well, and chop them pretty fine. (Unless the stalks have gotten really thick, the stems and leaves will cook altogether rather nicely. Keep thicker stalks separate if they will need a bit more cooking time than the leafy part.)
Heat olive oil in a sautee pan over medium-high heat. Give the garlic cloves a smack with the side of your knife, just to get the juiciness flowing, and then lightly brown the cloves smacked-but-whole on both sides. Watch them so they don’t burn.
Once the garlic is lightly browned, toss in the greens and sautee until tender. Salt and pepper to taste. (I go light on the salt if I’m planning on adding cheese. I also like my beets pretty peppery.) Pull off the heat when done.

To assemble: The convenient part of this recipe is that it works at a range of temperatures. It doesn’t matter if the beets or the greens are done first. When both are done, toss the beet pieces in the pan with the greens (not to cook but to coat with all the nice pan juices). Remove garlic cloves and then put the beets and greens in your serving bowl. Toss with the crumbled blue or feta cheese.

A few considerations:
- If you don’t want you cheese too pink, sprinkle and toss just before serving.
- If you are refrigerating before serving, let the salad come back to room temp before serving. Tastes best in the “cool room temp” to “warm” range.
- If you choose not to use cheese, I’d mince that nice browned garlic and toss it in instead. It’s a little too much in combination with the cheese, though. (No need to waste that nice, browned garlic clove, though. Spread it on a piece of bread, why don’t you?!)
Finally, let me send out a general call for favorite simple salads, especially those that use no lettuce but rather highlight an individual vegetable of the season.

Monday, May 25, 2009

Wedding Cake!!

Here are some of my favorite wedding cake pictures (even though some of them are only ingredients and equipment). I'm still trying to figure out how to post my little slide show. Hold tight, and best to all!


Oy! I can't get these pictures to line up in narrative order, so here you are. Treat it like a puzzle and figure out what order they are.

Saturday, May 2, 2009

Hummus!!!

(From Rita's kitchen... not on FB)

I *love* this recipe with roasted peppers or sundried tomatoes... Mmm!

Here's the basic hummus recipe I use -- feel free to adjust the garlic and
lemon to taste.

* 1 small can chickpeas (about 2 1/2 cups) drained, but retain the liquid. (Or soak 1 1/4 cup dried chickpeas overnight.)
* Juice of 2 small lemons (about 1/3 cup)
* 2-3 cloves of garlic, peeled (2-3 teaspoons if you use the pre-minced jarred variety). You can roast the garlic if you like a milder taste or skip it altogether if garlic isn’t your thing. I just throw it in as is.
* 1 teaspoon salt (kosher salt, if you have it)
* 5 tablespoons of tahini (sesame paste)

(Rita gets her tahini from East Dearborn - saves a BUNDLE!!!!)

Throw everything in a food processor and blend. Once it’s well mixed, add additional items if you want — roasted red peppers, sundried tomatoes, etc. I usually start with a small amount — 1/4 cup or less and then add more according to taste. (For the pesto hummus, I used about 4 teaspoons of pesto sauce.) Blend some more and add the retained chickpea liquid a little at a time as needed to get a smooth consistency. I tend to make mine a little on the thin side because I noticed that it will thicken up on it’s own — especially after freezing.

That’s it. This makes about 3 1/2 to 4 cups of hummus. It freezes really well
so I’ll usually buy one of those restaurant-size cans of chickpeas, make a big batch and put it in containers.

Tea Time Scones!

tea time scones, courtesy of jt

2 cups all-purpose flour (i prefer king arthur)
1/4 cup granulated sugar (super fine works better, i think and i up it to nearly 1/2 cup for american tastes)
1 tbsp baking powder
1/2 tsp baking soda
1/2 tsp salt
1/2 cup cold butter, cut into pieces
1/2 cup dried currants (i up this to 1 cup) or maybe cranberries or blueberries or chocolate or :) :)
1 egg
1/2 cup buttermilk (i up this a bit when i add extra sugar)

topping

1 tbsp buttermilk
2 tbsp granulated sugar

1. in large bowl, stir together flour, sugar, baking powder, baking soda and salt. cut in butter using a pastry blender or fork (this is always a part that i over-do) to make COARSE crumbs. stir in currants.

2. in another bowl, beat egg with buttermilk. stir into dry ingredients to make a soft dough.

3. turn out onto floured board and knead dough gently three or four times (also something that i sometime forget to do but it's important); pat or roll out into circular shap about 3/4 inch thick. i made the last batch too thin. i think that this should be a GENEROUS 3/4 inch thick.

4. cut into 12 triangles like a pizza. arrange on prepared baking sheet.

5. brush with buttermilk and sprinkle with sugar to taste. bake at 400 degrees F for 16 to 20 mins or until golden. transfer to rack.

enjoy!

Monday, April 27, 2009

Daring Baker Secret Challenge: CHEESECAKE!

So I'm doing this online cooking and baking challenge at TheDaringKitchen.com. (Go there to see some truly beautiful challenge pictures. It's pure, well, cheesecake.) I've felt like I need to experiment more, and this seemed like a fun way to do it. The monthly challenge is issued on one date, and all the Daring Bakers (or Daring Cooks) complete the challenge but don't reveal their results publicly until a specified date. Today is the date for my first REVEAL.

The April 2009 challenge is hosted by Jenny from Jenny Bakes. She has chosen Abbey's Infamous Cheesecake as the challenge.

Introducing....


The “Cuppa” Cheesecake (or the Teasecake)

Okay, so this is my very first challenge. I went conceptual. I've been interested for a while in using tea in cooking and baking. At first I was going to try a green tea infusion, but because I was about to host a pub night (complete with 4 varieties of pasties), I decided to try a strong black tea.

The Plan:
* Use Yorkshire loose leaf, a nice strong flavor. Steep it in the cream (as in the lavender suggestion in the original challenge), cool and strain. I figured a good deal of liquid would get absorbed by the leaves, so I started with more than the specified amount of cream.
* Bake and serve in tea cups. If the tea taste came though, what could be cuter? I figured the baking time would be shorter, but I didn’t know by how much. I thought I’d bake for 30 min and then start checking.
* Substitute McVitie’s Digestive Biscuits for graham crackers for the crust. A cute no-brainer.

The Unexpected:
* Well, Yorkshire tea sucked up a whole lot more liquid than I expected. Like ALL of it. (Okay, so I used a lot of tea -- a whopping 1/3 cup of those finely cut leaves in about 1-1/2 cup of cream.) The resulting sludge (sorry, no other word to describe the tea-and-cream substance) I tried to put through a fine mesh sieve. I could only extract less than half the liquid I needed, so I topped it off with fresh cream. The balance of sweetness and bitterness was good, but I knew the flavor would have to be even stronger in order to stand up to the cream cheese and lemon. The Yorkshire tea is so fine that I decided to add some of the steeped leaves right into the batter. (
A risk, I know, but I’ve always liked those little bits of tea leaves in my cup.) I started off a couple of Tbs at a time, but eventually I added the entire mass of cream soaked tea leaves.
* Because I had to use two different cup types, I knew they likely wouldn’t all be done at the exact same time. I had a hard time telling doneness, and I think I left them in longer than I should have. (40 or 45 minutes... I’m not exactly sure.) I found them a bit drier than I would have wanted them (not a surprise with all those tea leaves), but no cracking at all. As I guessed, the slightly thinner cups were done before the thicker cups.

The Result:
* The bitterness of the tea was a nice offset to the sweetness of the cake. (Did I mention that I love baking but have almost no sweet tooth?) If I concentrated, I could find the taste of a nice cup of strong tea with milk in it, but mostly it tasted like a decent cheesecake with an unusual flavor profile. Some people liked it a lot, others seemed to think it was “fine.” There were no half-eaten cups at the end of the night, at least. (The funniest reaction came from a friend who cannot abide cheese of any kind. She had a most troubled look on her face as she began eating, but when I looked again few minutes later she was polishing off the last bite, somehow having acquired the taste as she ate.)
* The texture of the leaves was not as troubling as I was worried it might be. Like I say, the Yorkshire leaves are cut really fine. Strangely, the graininess of the digestive biscuit crust really made it all work together.

The Verdict:
* I’m awfully glad I tried this experiment, but my partner said it best when he noted that the tea flavor just didn’t meld with the sour notes of the cream cheese and lemon. I think I’d definitely use McVitie’s again, though. I liked the slight graininess. I’d also do cheesecake in teacups again. I just would cut off baking time at 30 minutes to keep the creaminess.

I’m just awfully glad to have a good excuse to experiment with the oven again! It’s been a while since I just tried new things and tried the unknown. Still, the pasties and not the “cuppa” cheesecakes were definitely the stars of the evening. (See the post "Pies Like These" below.)

Tuesday, April 21, 2009

Pies Like These

Well, D and I finally made good on our pub night promises, and so Latenac and I made about 48 pasties in 4 different varieties. I started with the basic pie and crust recipe from BarefootKitchenWitch (wonderful site, btw; go browse it!). Her recipe suggests that each batch of dough makes 8 pies, which is a good proportion unless you are trying to make a million pies and only have one afternoon to pull it off. We made 12 smaller pies out of each batch of dough. It was harder to work with and crimp the smaller piece of dough, but the smaller size worked better for a big party. If I make pies again, though, I'll do the recommended 8 pies to a batch.


Okay, so this posting is really about showing off the oven picture and passing on the filling recipes (such as they are). Here we go:

Traditional Beef (pretty much what is says at BarefootKitchenWitch)
* 1 lb. beef, cut into small pieces (most recipes suggest chuck of some kind, but we used a nice top round)
* potato and rutabega, thinly sliced and then coarsely chopped a few times (otherwise it pokes through the soft dough, especially if you are making smaller pies)
* onion, small dice
* thyme
* salt and lots of pepper
We used a very lean beef, and so we tossed it in 2 Tbs. of melted butter before mixing it all together. (As Jaques Pepin says, you don't have to use butter, but why wouldn't you?) I really just eyeballed this one, but I think you want to see something like a 2-to-3 ratio of meat to vegetable here.

Pork and Apple
* 1 lb trimmed pork loin, cut into small pieces
* granny smith apples, peeled and chopped into chunk just slightly larger than the pork
* onion, finely chopped (about 1/4 or a cup, I should think; it's only to accent)
* Herbs de provence (or just some thyme would work, too)
* salt and light pepper
We tossed this in 2 Tbs. of melted butter, too. Why mess around? The proportion of pork to apple and onion should be about 1-to-1.

Lamb and Stilton
* 1 lb ground lamb
* 6-8 oz Stilton cheese, crumbled
* 1 medium potato, grated
* 1/2 c chopped parsley
* salt and light pepper
This one actually doesn't need any butter for some strange reason. Easiest to mix this by hand. (Note: We didn't use potato in the original recipe, but I'm adding it here because I think it would make the final product a bit less dense.)

Leek and Gruyere
* 3 leeks, thinly sliced
* 1 small potato, grated
* 8 oz gruyere cheese, grated
* 1/2 tsp ground nutmeg
* light salt and pepper

Pies should get a thorough egg wash (beat an egg or two with just a touch of water) before baking. We baked each kind for about an hour, rotating and switching top for bottom pans every 15 minutes (which may or may not have be plain fussiness). The leek pies may not have needed quite that amount of time, but an hour seems to be what the crust wants to turn nice and golden.

I am quite convinced that pies like these are very amenable to experimentation and also quite forgiving. Let me know if you find or taste other interesting varieties.

Sunday, April 12, 2009

Bread Pudding Pancakes


This is Andrew. Actually this is Andrew after you mention the words "bread pudding". It's also his face when you mention that somewhere serves breakfast anytime. So when I read about Bread Pudding Pancakes, I knew it was an opportunity to see this smile.

When I first saw the recipe it seemed to be missing some of the fringe benefits of bread pudding so I added raisins, raisin bread (rather than plain white bread) and vanilla to it. I also added an extra kick of cinnamon. If you're not a huge cinnamon fan, I would suggest skipping it. Other fun bread could be used instead of raisin and the person I got the recipe from added dried cherries rather than raisins. So there's a lot of wiggle room.


Bread Pudding Pancakes

Source: Adapted from Bon Appétit (Makes 14 pancakes)

¾ cup all purpose flour
½ tsp. cinnamon
2 tablespoons sugar
1 tablespoon baking powder
½ teaspoon salt
7 ounces (about 5 slices) firm raisin bread, crusts trimmed, cut into 1/2-inch pieces
¼ cup raisins
1 tsp. vanilla extract
2 cups whole milk
2 large eggs, beaten to blend
3 tablespoons butter, melted
2 tablespoons (or more) butter
Maple syrup or fruit syrup

Stir flour, sugar, baking powder, cinnamon and salt in small bowl to blend. Place bread, vanilla and raisins in large bowl and add milk. Let stand until bread is very soft and beginning to fall apart, stirring mixture occasionally, about 15 minutes. Add flour mixture to bread mixture and blend. Mix in eggs and 3 tablespoons melted butter. Let batter stand 15 minutes.

Preheat oven to 300°F. Melt 2 tablespoons butter in heavy large skillet over medium heat. Drop batter by 1/4 cupfuls into skillet. Cook pancakes until bubbles form on surface and bottoms are brown, about 2 minutes. Turn pancakes over; cook until cooked through and brown on bottom, about 2 minutes longer. Transfer to baking sheet. Keep warm in oven. Repeat with remaining batter, adding more butter to skillet as needed. Serve pancakes with syrup.

Saturday, April 11, 2009

RECIPE: President Roslin's Spicy Shrimp Salad (BSG Finale)

This is a salad I invented for a Battle Star Galactica series finale party. Danny was showing off his pizza skills with five BSG themed pizzas, each represting a different season of the show. I tried to show him up with this...

I'm calling it "President Roslin's Spicy Shrimp Salad" because recently I took a What BGS Character Are You? quiz on FB and turned up Roslin. Bhhhhrrrrr! Anywhere, here's a picture of Roslin toking up. I bet she and Adama would have particularly enjoyed this salad that day.


Step 1:
1 lb. raw, peeled shrimp
1/2 c. white or apple cider vinegar
1/2 c. water
2 Tbs. Old Bay spice mix
1 tsp. chipotle or cayenne pepper (2 tsp. if you like it spicy-spicy)

Bring water, vinegar and spices to a rapid boil in a pot. Add shrimp and cook about 3 minutes, tossing shrimp occasionally as it cooks. Drain BUT DO NOT RINSE the shrimp. Set aside.

Step 2:
a couple carrots
about a half a medium-small jaicama
rice wine vinegar (or white balsamic, or lime juice, or whatever acid you prefer)
a few drops of sesame oil (optional)

Peel or scrape the carrots and peel the jaicama. Julienne the veggies (a mandolin is convenient, but you can do it by hand) to matchsticks. You'll want to eyeball the proportions. You'll want about equal amounts of carrot to jaicama, and the mass of the veggies should be about twice that of the mass of the shrimp. (Sorry not to be more precise here. I'm an eyeball cook.) Toss the veggies in the vinegar and sesame oil. (You probably don't need added salt, since the shrimp will be salty on their own, but if you want to add a bit extra, add it to the veggies at this stage.)

Step 3:
arugula
baby spinach
olive oil
cilantro

Assemble the salad. Make a nice bed of half arugula and half baby spinach. Toss lightly with olive oil. Distribute the veggies over the greens. Distribute the shrimp over the veggies. Sprinkle chpped cilantro over the whole salad.

Probably serves about 6 as a side salad or 2-3 as a main dish.


Notes and tips:
  • Keep an eye on that shrimp. You may need to adjust cooking time depending on size of shrimp. When everything looks pink IT'S DONE! No overcooky shrimpy!
  • Save shrimp shells -- whether raw or cooked -- in a baggie in the freezer. Later you can make a most delicious stock with them.
  • I bet if you couldn't get jaicama you could use apple. Make sure the apple matchsticks are covered with the vinegar so they don't discolor. The sweetness might be particularly nice if you kicked up the spiciness of the shrimpt to 2 tsp. of cayenne. Just a guess...